Skip to content

FREE SHIPPING ON ORDERS ABOVE ₹999

  • NAIL ART
  • MAKE UP
  • HAIR CARE
  • SKIN CARE
  • TRACK ORDER
Login
Shills Professional
  • NAIL ARTNAIL ART
  • MAKE UPMAKE UP
  • HAIR CAREHAIR CARE
    • HAIR MASK

    • HAIR STRAIGHTENING CREAM

    • HAIR SPRAY

    • COLOUR HAIR SPRAY

    • HAIR WAX STICK

    • HAIR FIBER POWDER

    • SHAMPOO

  • SKIN CARESKIN CARE
  • TRACK ORDERTRACK ORDER
Login Cart 0
Cart

Your cart is currently empty.

Not sure where to start?
Try these collections:

  • CAT EYE GEL POLISH
  • MAKE-UP
  • EYE
  • HAIR
    Taxes and shipping calculated at checkout
    Subtotal
    ₹ 0
    View cart
    Recently viewed
    Search
    Home Shop All 0 Cart Account
    Golden Double Thick Nail Form-2 - Shills Professional

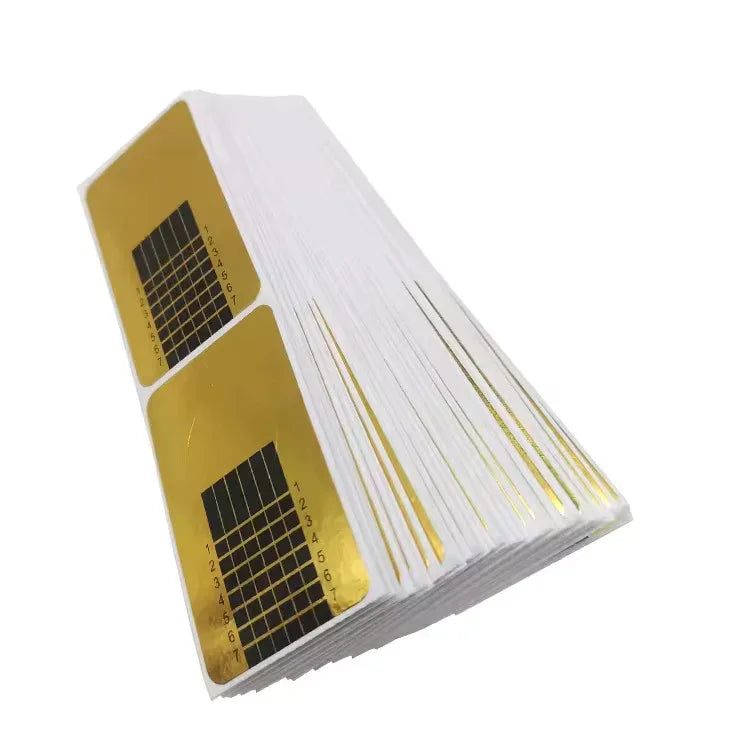
    Golden Double Thick Nail Form-2

    ₹214 ₹225 Save ₹11

    MRP inclusive of all taxes

    Delivery within 5–7 business days
    Golden Double Thick Nail Form-2

    This site is protected by hCaptcha and the hCaptcha Privacy Policy and Terms of Service apply.

    5% Off for New Customers
    Use Code: FIRST5

    Secure
    Payment

    ₹

    COD
    Available

    Description

    Golden Double Thick Nail Form-2 is developed for professional nail sculpting applications where a stronger and more stable nail form is preferred.

    Unlike thinner forms that may bend or collapse during application, the double-thick construction provides enhanced support while the nail enhancement material is being placed and shaped. This helps technicians create cleaner extensions with more controlled structure.

    The form is positioned underneath the free edge of the natural nail and acts as a temporary foundation while gel, builder gel, acrylic, polygel, or another compatible sculpting material is applied.

    Once the enhancement has been properly cured or set, the form can be carefully removed, leaving behind the newly created nail extension.

    Key Features
    Double-Thick Construction: Provides stronger support and improved stability during sculpting.
    Professional Nail Extension Form: Designed for building nail length without requiring a traditional full-cover nail tip.
    Structured Sculpting Support: Helps maintain the desired extension shape while gel, acrylic, or polygel is applied.
    Printed Guide Markings: Measurement and shape guides help technicians create more even and consistent nail lengths.
    Golden Professional Appearance: The gold-toned surface provides a premium salon-style presentation.
    Flexible Yet Supportive: Can be adjusted around different nail shapes while maintaining sufficient firmness for sculpting.
    Helps Improve Symmetry: Guide lines make it easier to align the extension with the natural nail.
    Suitable for Multiple Nail Shapes: Can be used to create square, coffin, ballerina, almond, oval, stiletto, and other sculpted designs depending on technique.
    Works with Different Extension Systems: Suitable for compatible gel, builder gel, acrylic, polygel, and sculpting systems.
    No Permanent Tip Required: Provides a temporary sculpting platform that is removed once the nail extension is completed.
    Professional Salon Essential: Useful for nail technicians, nail educators, beauty academies, and extension specialists.
    Ideal for Custom Lengths: Allows the technician to select the exact extension length according to the client's preference.
    Helps Control Sidewall Structure: Proper positioning assists in creating cleaner and more balanced sidewalls.
    Supports Advanced Nail Art: Suitable for long extensions, dramatic shapes, competition-inspired designs, and creative sculpted nails.

    How To Use

    Step 1 – Prepare the Natural Nail

    Begin by sanitizing the hands and preparing the natural nails.

    Gently push back the cuticles and remove any non-living tissue from the nail plate.

    Shape the free edge of the natural nail as required.

    Lightly prepare the nail surface according to the requirements of the selected nail enhancement system.

    Remove all dust, surface oil, moisture, and residue before continuing.

    Apply dehydrator, primer, or bonding products where required by the chosen system.

    Step 2 – Select and Prepare the Nail Form

    Take one Golden Double Thick Nail Form-2.

    Inspect the shape and guide markings before application.

    If the center section needs adjustment, gently customize the opening so that it fits naturally underneath the client's free edge.

    The form should sit closely against the underside of the natural nail without leaving unnecessary gaps.

    Step 3 – Position the Form

    Slide the form carefully underneath the free edge of the natural nail.

    Align the central guideline of the form with the center of the natural nail.

    Check the form from the top, front, and side angles.

    The form should continue naturally from the nail without pointing excessively upward, downward, left, or right unless a specific corrective technique is intentionally being used.

    Step 4 – Secure the Form

    Wrap the side wings comfortably around the finger and secure them according to the form design.

    Pinch or adjust the lower section where required to create the appropriate tunnel or curvature for the desired nail shape.

    Make sure the form remains stable before applying the sculpting material.

    Step 5 – Build the Extension

    Apply the selected gel, builder gel, acrylic, polygel, or compatible sculpting product over the natural nail and onto the form.

    Use the printed guide lines to determine the desired extension length.

    Create the free edge first where appropriate, then continue building the nail structure.

    Maintain balanced sidewalls and a consistent center line.

    Step 6 – Create the Nail Structure

    Build the extension according to the chosen nail system and nail shape.

    Pay attention to:

    Extension direction
    Sidewall symmetry
    Nail thickness
    Free-edge structure
    Apex placement
    C-curve or tunnel
    Overall balance

    Avoid making the free edge excessively thick unless required for a particular design.

    Step 7 – Cure or Allow the Product to Set

    For gel or polygel systems, cure under a compatible UV/LED lamp according to the product manufacturer's recommended curing time.

    For acrylic systems, allow the enhancement material to polymerize and become sufficiently firm before removing the form.

    Step 8 – Remove the Nail Form

    Once the extension is structurally stable, gently release the secured sides of the form.

    Carefully pull the form downward and away from the newly sculpted nail.

    Do not force the form against uncured or soft enhancement material.

    Step 9 – Refine the Shape

    File the free edge, sidewalls, and surface structure as required.

    Correct any irregularities and refine the selected nail shape.

    Buff the surface where appropriate before applying color, nail art, or top coat.

    POLICIES
    • Shipping Policy
    • Privacy Policy
    • Refund Policy
    • Terms of Service
    • Return Policy
    HELP
    • Affiliate & Influencer Collab
    • Contact Us
    • Track Order
    • Blogs
    CONNECT
    • Mon- Fri (10:00 AM to 7:00 PM)
    • customercare@shillsprofessional.com
    • 📞+91 9967764352

    Shills Professional

    Subscribe to get latest update

    • Facebook
    • Instagram
    • YouTube
    © 2026 Shills Professional. Powered by Shopify
    • Choosing a selection results in a full page refresh.
    • Opens in a new window.