
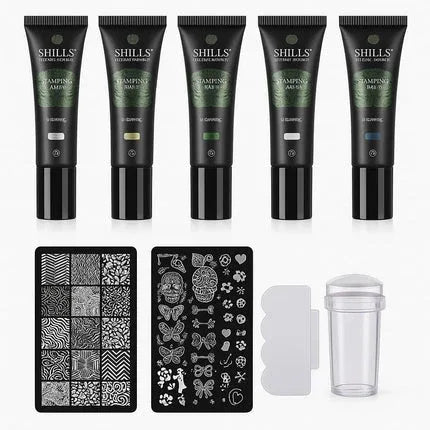
Stamping Gel Kit SPN-2691
MRP inclusive of all taxes
5% Off for New Customers
Use Code: FIRST5
Secure
Payment
COD
Available
Description
Shills Professional Stamping Gel Kit SPN-2691 is a specialized nail-art gel system developed for creating crisp, detailed, and professional-looking stamped nail designs with greater precision and control. Formulated with a smooth yet viscous consistency, the stamping gel is designed to fill the fine lines and intricate details of stamping plate patterns effectively, allowing designs to be picked up with a compatible stamper and transferred beautifully onto the nail surface.
Unlike ordinary nail polish that may be too thin or inconsistent for highly detailed stamping work, this specialized stamping gel provides controlled coverage that helps patterns appear more defined and visually striking. Its workable consistency gives nail artists greater control during the stamping process and helps reduce common problems such as uneven pattern transfer, insufficient coverage, and unwanted smudging.
The Stamping Gel Kit SPN-2691 is an excellent choice for creating everything from delicate floral motifs and geometric patterns to abstract designs, lace effects, seasonal artwork, decorative lines, and sophisticated salon-style nail art.
Because the gel remains uncured during the pickup and transfer stages, nail technicians have greater control over positioning the design before curing it under a compatible UV/LED nail lamp. Once the stamped pattern has been positioned correctly, it is cured and sealed with an appropriate top coat to complete the manicure.
Suitable for both natural and artificial nails, this stamping gel kit provides nail technicians, nail artists, salon professionals, students, and experienced nail enthusiasts with a versatile way to produce detailed nail art without having to hand-paint every individual pattern.
Key Features
Specialized Stamping Gel Formula: Specifically designed for nail stamping rather than ordinary color application.
Smooth, Viscous Consistency: Provides controlled application across stamping plate designs and helps capture fine pattern details.
Precise Pattern Transfer: Helps create clean, detailed, and defined stamped nail-art designs.
Superior Coverage: Formulated to provide strong visual coverage so stamped patterns remain noticeable on the finished manicure.
Controlled Application: The gel consistency provides greater control while filling, scraping, picking up, and transferring designs.
UV/LED Curable: Stamped designs are cured under a compatible professional nail lamp after transfer.
Suitable for Detailed Designs: Ideal for intricate patterns, geometric artwork, floral motifs, lace effects, decorative lines, and numerous creative designs.
Reduced Smudging Risk: Controlled gel consistency helps minimize unwanted spreading and uneven application when used correctly.
Natural & Artificial Nail Use: Suitable for creating stamping designs over compatible manicures on both natural nails and artificial nail enhancements.
Professional Nail-Art Results: Designed for technicians who want clean and visually defined stamping effects.
Creative Design Versatility: Allows numerous patterns and nail-art combinations to be created using compatible stamping plates.
Ideal for Salon Nail Art: A practical addition to professional nail-art stations, beauty academies, and creative manicure kits.
How To Use
Step 1 – Prepare the Nails
Begin with properly prepared nails. Clean, shape, and gently buff the natural or artificial nail surface according to the manicure system being used.
Remove all nail dust and surface contamination.
Step 2 – Apply Base Coat
Apply a thin, even layer of compatible base coat and cure.
As a general guideline provided for this product, cure for approximately:
LED Lamp – 60 seconds
UV Lamp – 120 seconds
Always consider the requirements of the specific lamp and nail system being used.
Step 3 – Apply Your Base Color
If a colored background is desired, apply the selected compatible gel polish shade.
Cure appropriately before beginning the stamping process.
Choose a base color that provides sufficient contrast with the stamping design when you want the pattern to appear particularly noticeable.
Step 4 – Select Your Stamping Plate Design
Choose the desired pattern from a compatible nail stamping plate.
Make sure the stamping plate is clean and free from dust, oil, dried product, or other contamination that could interfere with pattern pickup.
Step 5 – Apply the Stamping Gel
Apply a suitable amount of Stamping Gel over the selected engraved design on the stamping plate.
Make sure the gel adequately covers the pattern area.
Step 6 – Scrape Away Excess Product
Hold a compatible stamping scraper at approximately a 45-degree angle and move it across the design to remove excess gel.
The objective is to leave stamping gel inside the engraved areas of the pattern while removing unnecessary product from the plate surface.
Step 7 – Pick Up the Design
Immediately roll or press a compatible nail stamper over the selected design.
The uncured stamping gel pattern should transfer from the plate onto the stamper.
Inspect the stamper to make sure the required details have been picked up correctly.
Step 8 – Transfer the Pattern to the Nail
Carefully align the stamped design with the nail.
Gently roll or press the stamper across the nail surface to transfer the pattern.
Avoid touching the surrounding skin with uncured gel.
Step 9 – Check the Design
Before curing, inspect the transferred pattern.
Since the gel remains uncured during transfer, make sure the design is correctly positioned and unwanted product has been removed from surrounding areas.
Step 10 – Cure the Stamped Design
Once satisfied with the placement, cure the stamped design.
Recommended guideline:
LED Lamp – approximately 60 seconds
UV Lamp – approximately 120 seconds
Ensure the complete design receives adequate lamp exposure.
Step 11 – Apply Top Coat
After the stamped pattern has been cured, apply a compatible top coat over the finished nail design.
Cap the free edge where appropriate to complete the manicure.
Step 12 – Final Cure
Cure the top coat according to the required curing time.
Once completely cured and finished according to your nail system, the stamped manicure is ready.
Stamping Gel Kit SPN-2691


